Pages

Disney PLANES Fire & Rescue Windlifter Lunch

Wednesday, July 30, 2014


Back to School season is already here for many families. Because it's that crazy time of year again, I have some fun ideas for you to make the transition from summer to school easier. Last week I took my kids to see the Disney movie Planes Fire & Rescue. We had so much fun that I had to make some Planes lunches this week! Monday I posted my Dusty Crophopper lunch. You can see it HERE. Today is Windlifter flying over the burning forest. I had to put in trail mix again because it's pretty healthy and the movie takes place in the woods.

I made this lunch in an Easy Lunch Boxes container. Pacific Foods also sent me some food to try out so I included their Fruit Company Pears and organic almond milk in this lunch. 

Remember to follow me on my social media channels for even more great back to school and parenting ideas. It's easy to find me, just click on my social media buttons to the right.

Ingredients
Pear
Tortilla
Broccoli
Cheddar Cheese
Whole Wheat Bread
Trail mix
Pepperoni
Nori (dried seaweed)
Organic Almond Milk
Black food coloring or food color markers

Directions
1. Slice pear in half. Cut one large strip and two smaller strips from a tortilla. Draw facial features on pear and tortilla strips as shown in picture.

2. Cut two strips of whole wheat bread. Attach bread and tortilla on using toothpicks. 

3. Cut slice of cheddar cheese into smaller flame shaped pieces. Place nori as background in main container. Next put cheese and then broccoli on top of that. Last, put Windlifter helicopter on top. Use the picture as your guide or come up with your own fun scene!

4. Arrange pepperoni or other reddish lunchmeat in side dish. Cut out the Planes name and logo from tortilla scraps and put on top. I used pepperoni because the Planes logo is red and I had it on hand.

5. In second side dish, put trail mix of your choice. I served the almond milk on the side for this lunch.  It came in a convenient "juice box" type container from Pacific Foods. 


Disclosure: I received the above mentioned two products for free from Pacific Foods. I have received no other compensation for this post and the opinions I’m expressing here are solely my own.
#lbdbento

Disney PLANES Fire & Rescue Back to School Lunch

Monday, July 28, 2014

Disney Planes Fire and Rescue Lunch Recipe

Believe it or not it's officially back to school season for many families. Because it's that crazy time of year again, I am going to be giving you some great ideas, over the next few weeks, to make the transition from summer to school easier and more fun. Last week I took my kids to see the Disney movie Planes Fire & Rescue. We had so much fun that I had to make some Planes lunches this week! Today is Dusty Crophopper flying over the burning forest.

The carved apple is was supposed to be similar to the Planes logo and I had to put in trail mix. What's a story about being in the woods without some trail mix to go along with it? I made this lunch in an Easy Lunch Boxes container. Pacific Foods also sent me some food to try out so I included their buttermilk bread and almond milk in this lunch. 

Remember to follow me on my social media channels for even more great back to school and parenting ideas. It's easy to find me, just click on my social media buttons to the right.


Dusty Crophopper Planes Lunch
Ingredients
Broccoli
Dried mango
Nori (dried seaweed snacks)
Organic buttermilk bread
Cheddar cheese
Tortilla
Red apple
Trail mix
Chocolate Almond Milk
Blue food coloring
Toothpicks
Cream cheese (optional)


Directions
1. Cut a Dusty Crophopper shape out of a piece of bread. Its really simple just look at the picture of mine, it's much easier than it looks. Don't forget the pontoons! Also cut out slivers for propeller blades from the heel of the bread.

2. Slice cheddar cheese to make the three orange pieces. Make sure they line up and cover the bread where needed. 

3. Cut out the front window and little circle for the propeller from a tortilla. Make the eyes on the front window with dabs of blue food coloring. You can use toothpicks to stick the pieces together. Another tip is to use a few dabs of fat-free cream cheese to paste the cheese and bread pieces together.

4. Lay nori in the main compartment of the lunchbox. Put down your dried mango flames first. I actually didn't have to do much cutting because most of the pieces came looking that way. Put a few pieces of broccoli trees where desired. Finally, lay Dusty Crophopper on top of everything. 

5. Carve out "PLANES" from the apple by using a paring knife to make shallow cuts in the skin. Gently pry up the peel with the tip of the knife. Don't be intimidated, it doesn't take much time or talent at all! Place this in one side dish on top of tortilla scraps (if desired). Put trail mix in a second side dish.

6. I used Pacific Foods single serving box of almond chocolate milk to finish off this lunch. Have fun with this lunch and make sure to look out for a new Planes lunch later this week! 


Disney Planes Fire and Rescue Lunch Recipe


Disclosure: I received the above mentioned two products for free from Pacific Foods. I have received no other compensation for this post and the opinions I’m expressing here are solely my own.
#lbdbento

A Tiger Sandwich Lunch For My Son

Monday, July 21, 2014


This week, I thought it was time my son got his own special lunch. It has been awhile since I made one for him specifically, mainly because it's summer and we have been crazy busy. I wanted to try out these fun new cutters that I received from BentoUSA. They are a new release in their CuteZCute line. They were so easy and fun to use, a must for parents with a busy schedule! I also wanted to use more of my new lunch box containers from Fit & Fresh. This is their bento box model. To see my recent review of their products click HERE.

Why did I make tiger sandwich? Well, first of all because we had the right food, and second I thought my son would like to take a bite of this ferocious beast. I used chicken, bread, cheese, and greens so that he could make his own sandwich if he wanted to. I also thought the mango fruit dish was a fun addition. If your kids are a fan of animal themed lunches, you might want to give this easy one a try!


Ingredients
1 slice of bread
2 slices cheddar cheese
1 small square & four thin strips of nori (dried seaweed)
Handful mixed greens
1 strawberry
3 baby carrots (or whatever veggies your child likes)
1 mango, cut into slices
Handful of raisins
1/2 cup of shredded chicken


Directions
1. Use CuteZCute cutter on bread and cheese to make tiger shape. Seriously, the tiger is that simple.
2. Put nori square on bread and then cheese on bread. Place nori strips on cheese as shown.
3. Arrange mixed greens as the background in the main dish and place tiger, strawberry, and baby carrots around as shown in picture.
4. In first side dish, place desired amount of shredded chicken. In second side dish put the mango slices side by side and then fill in the gaps with raisins. This makes your tiger striped fruit dish!


#lbdbento

Review: Fit & Fresh Lunchboxes: Are They Fun & Functional too?

Friday, July 18, 2014

Fit and Fresh Review
It's almost "back to school" time which means shopping for pencils, paper, and lunchboxes. Investing in the right lunchbox is an important decision. As the parent you need the container to be practical and help your job to be easy. Your child wants the box to be cool so they can show it off to all their friends. 

I had the opportunity to put the Fit & Fresh line of lunchboxes to the test over the past few weeks. They carry every possible size and color of lunch container you can imagine. Whether you are a kid, or adult, Fit and Fresh has an option for you.

The thing is, none of that matters if the quality is poor or the kids don't like the look of them. So read on to find out what I found when I tested the Fit & Fresh line for fun AND functionality. Make sure and check back Monday for a special lunch I made in these lunchboxes!


Fit and Fresh Review

As you can see from the pictures above, the containers come in many fun colors and in any size you could ask for, including a full bento box. One of my favorite features is something that you don't think about until you already have the lunch ready--the ice pack. It can be a trick figuring out where to put them. Fit & Fresh created a little latch system inside each lid that will hold their ice packs. I love this idea! When I used them to take my own lunch to work, it kept the turkey pasta nice and cold.

All of their containers are BPA free and top rack dishwasher and microwave safe. This is important because you don't want to spend a bunch of time cleaning parts by hand if you don't have to. I ran each box through the dishwasher multiple times and they came out good as new. I also tested them in the microwave without any problems.

One of the issues I am always concerned about with these types of boxes is if my kids can open them. My daughter is going into second grade and has had some issues with this before. The Fit & Fresh lids are plastic with a soft lip around the edge. My daughter could open it no problem but I would test it out with younger kids before I sent them to school with it.

The one change I would make is with the bento box (pictured on the left). I wish the plastic dividers were removable so that you could reconfigure the box to work with other smaller size Fit & Fresh containers. Currently, you can only fit their smallest size containers. The bento style lunchbox can also be used with their insulated bag. These bags come in a variety of fun designs. I would highly recommend you get their bag if you are picking up a bento box. They work well together. 

The Fit & Fresh containers are sold individually and in kits. It is up to you to choose the amount of containers and style that is best for your child.

The other product I was fortunate enough to review was a drawstring insulated lunch bag...and it was shaped like a monkey! This might be the coolest lunch bag I have ever used. I even packed my lunch in there and took it to work one day.
Fit and Fresh Review
There is a monkey face on the front with a tail on the back. The top is opens and shuts with a drawstring. Inside is room enough for three lunch containers and a juice box or small water bottle. Also inside is a little pocket which can hold silverware, napkins, etc. In my lunch, I was able to fit a sandwich sized container with pasta in it, a medium container with grapes, and a small container with a little dessert. I did wish this bag was big enough to fit a bento style box, however.

The only part that i felt was missing from the monkey bag was a carrying strap. The drawstrings must double as a carrying strap. This is a little annoying at times. The whole bag can be easily wiped down to clean it. This monkey bag sells for $14.99. There are other animal varieties of this style for sale as well.

Overall, I was very pleased with Fit & Fresh's line of products. They offer a wide variety to fit many people's tastes and the products seem to be well made. They work easily for adults and kids and are also reasonably priced. You can go to www.fit-fresh.com to see all of their products and to place an order. Please be sure and check back Monday to see the fun lunch I made in the Fit & Fresh bento lunchbox!


Disclosure: I received these products for free from Fit & Fresh. I have received no other compensation for this post and the opinions I’m expressing here are solely my own.


#lunchboxreview

Sorry Kids, I Will Never "Let" You Beat Me

Wednesday, July 16, 2014


I just spent part of tonight beating my 7 year old daughter at Chutes and Ladders. Ok, it was only one game, but it was hard fought and I pulled it out at the end. It might sound like I enjoyed it, but c’mon, it’s Chutes and Ladders, no adult ever really enjoys that game! But I did care who won and who lost. In fact, whenever my wife and I play board games, sports, card games, or hopscotch with our kids—we don’t let them win. We never have. Yes, I know, we are terrible parents, right?

Listen, we don’t pull out every trick in the book or use grand master strategy to destroy them. I don’t get up and do a happy dance or throw it back in their face when they lose. However, sometimes they do win and it is fun for everyone. The thing is games aren’t always just about fun, sometimes they can teach us about life.

What kind of horribly competitive parents would do this? We are the kind of parents who love our kids and who actually want them to learn something about winning AND losing as they grow up. Somewhere along the line our culture came to the conclusion that our kids must win at everything. Every participant gets a trophy and we don’t use red marks on school papers. Well sorry kids, that doesn’t fly in our house and we will never “let” you beat us.

In his incredibly insightful book, Oh the Places You’ll Go, Dr. Seuss has a few lines that have rooted themselves in my parental thought process. The good Dr. says:

“Wherever you fly, you'll be the best of the best.
Wherever you go, you will top all the rest.
Except when you don't
Because, sometimes, you won't.”

As parents, we forget this. We shield our kids from the disappointments and losing in life. Sometimes it’s because we love them so much we never want them to experience defeat. Sometimes it’s because our own identity is tied up in them winning and it’s our own ego that gets in the way. No matter what it is, it’s not helping our children.

I remember playing little league baseball and seeing a few of my teammates getting trophies at the end of the season. I wanted one so bad that it drove me to be better. I practiced harder so that one day, I might get that trophy. If everyone got one would it have cheapened it? Absolutely. I want my kids to know the hunger that drives you to be the best and the exhilaration of accomplishing that. I also want them to know what it feels like to be humbled because someone is better than you. Because there is always someone better. It’s just a matter of time before you meet them.

It’s not that we don’t want them to win. It’s that losing “well” is just as important as winning “well.” My kids hate to lose. Honestly there are times when they’ve cried after losing a game. These moments of emotional distress turn into teachable moments to talk to them about how you can’t and won’t always come out on top, and that’s ok. Losing sucks, there’s no way around it. However, losing can show us how we can improve and how to maturely let someone else have the limelight. I love teaching my kids strategy about the game as we are playing it. When they get beat because of it, they see firsthand how to get better. If I let them win, I would deprive them of all these things. I also want our kids to know that they don’t always have to win to make us proud and they don’t have to win to get our love, they have that no matter what.

We are proud of them when they are in the front holding the 1st place ribbon, and we are proud of them when they play the best that they can and lose. In fact, I will hate when they are old enough to be on a team where everyone gets a trophy. Not only is it something else to clutter our house with, but it also hinders the drive to get better. Don’t get me started on the report card system. I am not ashamed to admit that I have problems figuring out exactly how my daughter did in school by her confusing report card. I need to hire a military code breaker to decipher the paper just to tell me if she passed 1st grade. How can I help her improve if I can’t even figure out how she did? With grades like A, B,C , D, and F you knew exactly where you stood and where you needed to go. Sometimes I feel as if schools are more concerned with everyone feeling special than they are with teaching them how to succeed.

I hope all three of my kids find where their talents are and beat the snot out of the competition. I will be there to cheer them on when they win. I will also be there to hold them when they lose. Hopefully, they will do each with grace and maturity.

Now if you’ll excuse me I need to get back to beating my son at Star Wars Chess.


#Fatherhood

Yasso Frozen Greek Yogurt Deluxe Prize Pack Giveaway!

Tuesday, July 15, 2014

Disclosure: This is a sponsored post, in conjunction with Yasso frozen greek yogurt. I was provided with product samples, and received compensation for participating in this promotion.

Yasso Frozen Greek Yogurt is hooking up Lunchbox Dad readers with a deluxe giveaway that includes a T-shirt, water bottle, multiple boxes of frozen yogurt bars, and more! You couldn't ask for a better prize pack for the middle of summer. Yasso makes some amazing frozen greek yogurt with flavors such as chocolate covered raspberry, peanut butter cup, mint chocolate chip, sea salt caramel, and more. Not only that but these are way healthier than your typical run of the mill ice cream bars.

All you have to do to enter is use the Rafflecopter Widget below, but hurry the drawing will happen soon!

In case you missed it, you can check out my post HERE that talks about all the fun we had with a Yasso party in the park. The kids and adults all left with smiles on their faces!
a Rafflecopter giveaway


Summer Turtle on the Beach Lunch

Monday, July 14, 2014

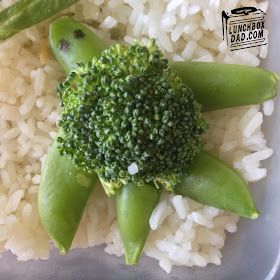
Turtle Lunch
Recently my blog was featured on Good Morning America! I had the pleasure to make personalized lunches for three of the hosts and a few other GMA logo lunches. The great thing about these is that they are all simple enough for anyone to do and you can replace the names with whomever you are making the lunch for. Since my daughter is on summer break, I thought I would share the recipes for these lunches over the next couple weeks. But don't worry, there is plenty of other stuff in store as well! 

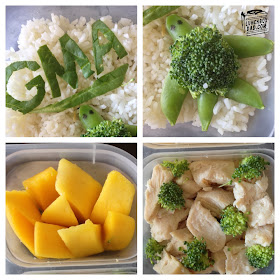
I thought I'd show you a lunch that looks hard but is so easy and fun. All you have to do to make it your own is switch "GMA" for the name of the person you are making the lunch for. This is made in an Easy Lunch Boxes container.


Turtle lunch
Ingredients
Broccoli
Snap peas
White rice
Mango
Grilled chicken strips
Fresh spinach from bag for "name"
Black food coloring marker

Directions
1. Cook rice according to box and place enough in main container to cover the bottom. Make turtle out of snap peas and broccoli and place in main dish where shown. Use black food coloring marker to make the eyes.
**for short video tutorial on how to easily make the turtle click the YouTube link below**
2. Choose 3 of your largest fresh spinach leaves and your longest leaf (including stem). Use sharp knife to cut a letter from each large leaf to form “GMA.” Cut GMA logo swoosh from longest leaf. Arrange logo letters and swoosh in main container where shown in picture.
4. Slice mango if you have not done so already. Place slices on end, with pointy part up, in side dish as shown. Pack in tight and they will stay upright.
5. Place grilled chicken slices in other side dish and put a few very small pieces of broccoli on top.
Turtle Lunch Bento#lbdbento

One of My New Favorite Grill Recipes: American Craft Bacon Ranch Sausages

This shop has been compensated by #CollectiveBias, Inc. and its advertiser. 
All opinions are mine alone.
American Craft Bacon Ranch Sausages #StartYourGrill #CollectiveBias #Shop

You know that feeling when you've found that one recipe? You know the one. It makes your mouth water just thinking about it, but it's simple enough to throw on at the last minute for those unexpected guests? The American Craft Bacon Ranch Sausage has become one of my family's go to grilling recipes for this month. We have used it tailgating, for family events, and also "just because." 

As a kid, I grew up loving sausages and loving baseball. There was something about sitting in the stands and having a hot dog while watching the two teams compete. It didn't matter whether it was the majors or little league, it wasn't baseball without a dog. I still loving going to the ballpark and getting a polish sausage smothered in peppers and onions. However, after I came up with this recipe, the ballpark frank has some serious competition. In fact, after you taste this recipe, you may never want to have a sausage another way again.

I found the American Craft sausage on a trip to Safeway grocery store. They were so easy to find because they are located in the same aisle with hot dogs, and right next to the bacon, which you will need for this recipe anyway!

American Craft Bacon Ranch Sausages #StartYourGrill #CollectiveBias #Shop

The great thing about American Craft Sausages (besides the taste) is that they are handcrafted to deliver the best possible flavor. If you look at how they make them, you will see they start with the best cuts of 100% pork and make them only with real ingredients like garlic and bourbon. Beyond all that, what doesn't go in them is just as important. American Craft doesn't have any nitrites, nitrates, or MSG. All you taste is the sausage, unlike other lower quality brands. All of this means is you need to use American Craft sausage in this recipe or you won't get the amazing taste that you and your family want. 

So #StartYourGrill and get ready for a recipe that will make you the hero of your next backyard party!

American Craft Bacon Ranch Sausages #StartYourGrill #CollectiveBias #Shop

Ingredients
American Craft Sausage (either Garlic & Onion or Smoky Bourbon flavor)
Strips of bacon, one for each sausage
1/4 cup brown sugar
1 avocado, diced
1 tomato, diced
1 cup fresh cilantro
Ranch dressing
Hot Dog or Sandwich style buns
American Craft Bacon Ranch Sausages #StartYourGrill #CollectiveBias #Shop
Directions
1. Wrap each American Craft sausage in one strip of uncooked bacon. Sprinkle with brown sugar and lightly pat the sugar onto the bacon to help it stay on. The brown sugar will caramelize while it cooks and give you an amazing sweet and salty flavor. Alternately, you may cook the bacon with brown sugar separately, dice it up, and top the sausage with it later. I prefer to cook it as shown.
2. Barbecue each sausage, making sure both it and the bacon are done evenly. You will know the sausage is ready when the bacon is crispy, but not burnt, and the sausage looks about ready to pop. Make sure you remove the sausage before it bursts, to seal in moisture. If you are barbecuing on a propane grill, cook the sausages over indirect heat in order to prevent bacon drippings from causing flare ups. 
3. Place sausage in a robust bun. This is not a recipe to go cheap on the buns with. Don't use the .99 cent special! I use a sourdough sandwich roll with mine. 
4. Top sausage link with avocados and tomatoes. Sprinkle cilantro sparingly over the top. Finish by drizzling ranch dressing on everything. 
5. Serve immediately with your favorite chips and side of summer fruit. However, be warned, you will be addicted to these American Craft Bacon Ranch sausages after only one time! You will keep coming back again and again so you might as well buy extra.

American Craft Bacon Ranch Sausages #StartYourGrill #CollectiveBias #Shop

Yasso Frozen Greek Yogurt Brought the Party to Us!

Wednesday, July 9, 2014

Disclosure: This is a sponsored post, in conjunction with Yasso frozen greek yogurt. I was provided with product samples, and received compensation for participating in this promotion.


A party at the park with kids sounds like fun for many families, but for this get together we were looking to take our afternoon outside to the next level. The first step was inviting a few of our friends and their kids to join us. The next step was deciding on food. It is summer, and the day was hot, so it was clear we needed something tasty to cool everyone down. We had a bunch of kids and adults so whatever we chose had to work for everyone. This is where Yasso Frozen Greek Yogurt came in. 

I remember as a young kid, playing with my friends in the neighborhood, and hearing the serenade of the ice cream man. There was no sweeter music in our neighborhood. Our ears were finely tuned to recognize his song and be able to make it inside to scrounge up change, and outside again to stop him, just in the nick of time. We would lineup to fill our stomachs with the amazing treats that he produced. 

Although those ice cream bars were fun, I know now how unhealthy they were. This is why I loved handing out Yasso to my family and friends, I was able to be the ice cream man. Only this time I knew I was giving them a healthier, but still tasty, alternative to the typical run of the mill ice cream bar.


I just drove down to my local grocery store and picked up some boxes of the four flavors (but Yasso has tons of varieties) that the store carried. The great thing was that there was enough so everyone got to choose whatever flavor they wanted and there was no fighting over the last one. We handed the Yasso bars out to the kids first. They had worked up a sweat at the playground so they couldn't wait to get their hands on these. The hardest part was choosing what flavor. Everyone had had the challenge of choosing between Mint Chocolate Chip, Sea Salt Caramel, Dark Chocolate Raspberry, and Peanut Butter Cup.

The kids made their choices and those frozen yogurt bars kept the peace for the rest of our time there. As parents we know how precious that time is. The best part was that all the parents were able to enjoy their time as well. We visited and laughed (of course we tried the Yasso bars too, because we couldn't let the kids have all the fun). 

My favorite flavor was definitely the Dark Chocolate Raspberry. It's blend of decadent chocolate with refreshing fruit totally hit the spot! I am huge on texture and the crunchy shell combined with the creamy yogurt was an unbeatable combo in my book.

the part of the Yasso bars that impressed me as much as the taste was what was missing from them. I'm talking about the calories, gluten, and artificial sweeteners. I couldn't believe there was only 100-130 calories in each bar, no gluten, and no artificial sweeteners. Each bar is made with only natural ingredients, and because it's made with real greek yogurt, there is plenty of protein in there! 

Needless to say the party at the park was a hit. The kids ran, and jumped, and played. The adults pushed babies on swings, chased the kids around, and caught up with what was going on with each other's families. The party was great but most importantly it brought friends together for a brief moment to share good times and good dessert.

The best news for you is that you can share your own great times this summer like I did. Grab your kids, go play outside, and get your favorite flavor of Yasso frozen greek yogurt. Create your own memories that your family will talk about for years to come. 

Yasso frozen greek yogurt comes in eleven different flavors. You can check out Yasso at online at www.yasso.com or just go down to your local grocery store to get some today!


Tennis Lunch for Your Athlete

Monday, July 7, 2014

Tennis Bento Lunch

Recently my blog was featured on Good Morning America! I had the pleasure to make personalized lunches for three of the hosts and a few other GMA logo lunches. The great thing about these is that they are all simple enough for anyone to do and you can replace the names with whomever you are making the lunch for. Since my daughter is on summer break, I thought I would share the recipes for these lunches over the next couple weeks. But don't worry, there is plenty of other stuff in store as well!

This might be my favorite lunch that I made for GMA. I am sharing it this week because Wimbledon just wrapped up so if you have a tennis fan in your family, this is an easy and fun lunch to do! You can customize the name on it for the person you are making it for. Special thanks to Kendra from Biting the Hand that Feeds You for the tennis ball idea. It is made in an Easy Lunch Boxes container.
Tennis Bento Lunch
Ingredients:
2 Green Apples (you will only need one, but it helps to have a backup in case you mess up)
1 lemon
Mixed nuts
Green M&Ms (ONLY green, just buy a regular bag and pick the green out)
Butter snap pretzels (must be this variety, they look like nets)
Two slices whole wheat bread
1 bag shredded coconut
Green food coloring
1 resealable bag
Sliced provolone cheese
Sliced turkey lunch meat


Tennis Bento Lunch


Directions:
1. Put half bag of shredded coconut in resealable plastic bag. Drop in 10 drops green food coloring. Seal and shake until the coconut becomes green. Put in 1-2 more drops if necessary. Arrange coconut in main container to cover the bottom.
2. Cut slice of bread into tennis racket shape as shown in picture. Repeat with second slice. Cut turkey lunchmeat and cheese into small circle and place between bread “rackets” to make a sandwich. Put sandwich in main container.
3. Cut thin slices of provolone cheese and arrange in a grid on top of sandwich.
4. Cut green apple in half and carefully make shallow cuts that just break the skin to form the seam of the tennis ball. For shape see picture. Gently stick knife underneath edge and pry up apple skin along the cut until only white is showing.
5.  Immediately slice a lemon and rub the wedge along the back of the apple and anywhere else you made a cut. This will prevent the apple from turning brown. Place apple slightly on top of tennis racket sandwich as shown.
6. In one side dish place pretzels. Use slice of provolone cheese to cut out Lara’s name. Arrange on pretzels.
7. In second side dish put mixed nuts and green M&Ms.
#lbdbento

Healthy & Simple Patriotic Popsicles

Wednesday, July 2, 2014

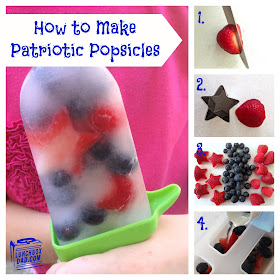
Patriotic Popsicles Recipe

It's almost 4th of July which means it's time for awesome fireworks shows and tasty patriotic themed food. My family and I came up with these fun patriotic popsicles as an alternative to all the other food that is normally served around this time. I mean chicken wings and bean dip are great, but you can only eat so much, right? I was inspired by this post HERE by The Nerd's Wife and put my own patriotic twist on the recipe. Remember you can use coconut water, flavored coconut water (for a different fruity flavor), or lemonade if you want that extra sweetness. The choice is yours!

Your family will love these easy to make treats around this holiday or any time of year! Have fun with these and let me know what other ingredients can give these popsicles a 4th of July flair!


How to make Patriotic Popsicles
Ingredients:
Popsicle molds
Star shaped cutter
Strawberries
Blueberries
Raspberries
Coconut water, flavored coconut water (my family prefers this option), or lemonade

How to make Patriotic PopsiclesDirections:
1. Cut stem off strawberries and slice them in half. Use star shaped vegetable cutter to cut each half into stars. The extra strawberry pieces can be used for tasty snacks.
2. Place strawberries, blueberries, and raspberries into popsicle molds. Don't stuff too tight because you need some room for the coconut water and popsicle stick itself.
3. Put the top of the molds on and place in freezer until frozen and you are ready to serve them. 
4. Have a fun and safe 4th of July!

#lbdbento

39 Reasons Why My Son Won't Eat Dinner

Tuesday, July 1, 2014

39 Reasons Why My Son Won't Eat Dinner

Maybe some of you have a picky eater in the house. My daughter will try most things. My four-year-old son has a new reason everyday for why he won’t eat. To borrow a line from the movie A Christmas Story, “my son works in reasons why he won’t eat the way other artists might work in oils or clay. He’s a true master.” Here are 39 reasons why my son won’t eat dinner. What are some reasons that your kids have given? Let me know in the comments!

1. I don’t want a baby spoon.
2. This spoon is too big.
3. Mommy makes it better.
4. Oranges are scary.
5. Pasta is scary.
6. I want a big boy cup.
7. I spilled my drink.
8. Water is scary.
9. Daddy makes it better.
10. Cantaloupe makes my lips tingle.
11. This plain pasta with butter is too spicy.
12. I’m tired, can I be done?
13. I only like blue carrots.
14. I’m not tired anymore I just want dessert!
15. I’m not hungry for dinner, can I have a snack?
16. I don’t like salad (said if any microscopic speck of green anything is spotted on his food).
17. Oops! The dog ate my dinner!
18. I gave the dog my fruit, he looked hungry.
19. I gave the floor my food, it looked hungry.
20. She looked at me.
21. He looked at me.
22. It’s too cold.
23. It’s too hot.
24. The dog looked at me.
25. I don’t like yellow scrambled eggs.
26. Sister touched me.
27. Sister won’t sit next to me.
28. I’m a chocolatarian, I only eat chocolate (ok, I made this one up but I’m positive it’s coming soon).
29. I want strawberries.
30. I don’t like "THOSE" strawberries.
31. What are you making? Whatever it is I don’t like that.
32. Can I have milk in my cereal?
33. Why did you put milk in my cereal?
34. How come she gets more? I want more...I’m full I don’t want my food.
35. I liked tomatoes yesterday, not today.
36. I don’t like this plate.
37. I only want the one bowl in the house that is impossible to find right now.
38. I just want cherries! (said a day after he would rather be thrown into solitary confinement rather than touch a cherry)

39. This food came within one inch of touching another food. The whole plate is now yucky.

#fatherhood
 
site design by Design Chicky (© copyright 2015)