Halloween Pumpkin Patch Lunch

Monday, October 28, 2013

Pumpkin Patch Bento
Year 2, Week 12: Halloween Pumpkin Patch Lunch.  This weekend my family and I visited a local pumpkin patch.  It was a ton of fun and my kids picked out a funny looking pumpkin to carve.  It was the first time they got to say what design was carved into the pumpkin.  It was one of those moments where the perfectionist side of me cringed and I had to let go.  That's what you have to do as a parent sometimes, isn't it?  It's hard, but it helps our kids have much more fun, even if its not how we pictured the project looking in our heads.  

This trip to the pumpkin patch helped inspire this week's lunch.  They have pumpkins of all shapes, sizes, and colors so I tried to make a lunch that reflected that.  This is an easy Halloween lunch because I used a few pre-made things that had a pumpkin theme.  I even threw in a little treat for her.  After all, it is Halloween!  This was made in an Easy Lunch Boxes container and I included a Halloween Lunchbox Love note.  At the bottom of the recipe there is also a list of some other great pumpkin patch lunches from talented bloggers. You will never run out of ideas for this theme!

mushroom pumpkin
Ingredients:
--2 large slices cheddar cheese
--4 mushrooms
--1 handful of broccoli heads and stems
--1 serving Ranch dressing
--1 piece of nori (dried seaweed)
--1 serving pumpkin shaped pretzels 
or similar snack
--1 serving pumpkin seeds
--1 pumpkin shaped treat such as a marshmallow or cookie
--1 Lunchbox Love note

Directions:
1.  Mix pretzels and pumpkin seeds and place in a side dish.  You can roast your own seeds or buy them in store.  We like making our own when we carve a pumpkin, it is easy and fun!
2.  In a second side dish place the marshmallow, cookie, or whatever other treat you wish to have in there.
3.  Take the slices of cheddar cheese and fit them, as the background, into your main container.  You might need to cut them to fit.  If you have a scrap large enough, cut out a small and simple pumpkin shape.
4.  Put small container in the corner of your main dish and fill with Ranch dressing.  Alternately you could use another of your child's favorite dipping sauces.  Make sure this container can seal shut.  The Easy Lunch Boxes mini-dipper works well so I used it here.  Place the small pumpkin you made earlier on top of the ranch dressing.
5.  Trim the stem off of four mushrooms.  Towards the top of each mushroom make a small "cross" cut with a knife.  Now take a little piece of broccoli stem and press it into the cut in the mushroom as shown in the picture below.  This creates your "white" pumpkins.
pumpkin shaped mushroom
6.  Place the white pumpkin mushroom in the main container.  Surround these with small pieces of broccoli.  To make the Jack-O-Lantern faces on the pumpkins, cut out small pieces of nori for the eyes and mouth.  You can also use a nori punch to make the shapes, it is much easier.  Make sure to also put a face on the pumpkin shaped cheese you made earlier.
7.  Top it all off with a Lunchbox Love note if you wish.  They make great decorations!

Other Great Blog Links For 
Pumpkin Patch Lunch Ideas:

Thanks for being part of my little blog.  I really appreciate each and every one of you readers.  Remember that I post many more food and parenting related things on Facebook and Twitter as well, so check out Lunchbox Dad there!  I hope you have a great week and a safe Halloween.  Don't raid, I mean "test," too much of your kid's candy!
#lbdbento

License To Spill Tour with Chef Ryan Scott and SmartStrand Carpet

Wednesday, October 23, 2013

I am a member of the Collective Bias® Social Fabric® Community. This shop
has been compensated as part of a social shopper insights study for Collective
Bias and their client. #cbias #licensetospill
Half moon Bay pumpkin festival
There are two things that I love to talk about on this blog: good food and things that help make parents' lives easier.  When I visited the License To Spill tour event, at the Half Moon Bay Art and Pumpkin Festival, I found both!  I was excited to meet Chef Ryan Scott and taste his chicken sloppy joes.  Ryan Scott was a contestant on Top Chef and stars on his show Food Rush.  However, when I was waiting to taste his recipe my family and I had the chance to put to the test a tool that all parents could use--Mohawk SmartStrand stain resistant carpeting.

The License To Spill booth had a fun area setup for kids to smash food and drink into the Mohawk SmartStrand carpet.  My kids made good use of the time by messing up the carpet as much as they could.  Chip Wade, from HGTV's "Elbow Room," was running this area.  He was great with the kids and gave them some messy tips.  The Mohawk people promised to clean it all up later in the day.  I was skeptical the carpet would come clean.

smartstrand technology
In the meantime, I had the chance to test out the carpet myself.  Mohawk gave me a carpet square and let me spray it down with Powerade and soy sauce.  The last spray bottle they gave me contained red wine.  This bottle was especially interesting to me because it reminded me of my own wine and carpet story.  

Two years ago we instituted the "Terry" rule at my house.  This rule is no red wine in the living room.  Terry is my father-in-law.  He loves exuberantly telling stories and also drinking red wine.  Sometimes he combines the two.  On this particular occasion we were sitting in the living room and he was telling us about something that had happened recently.  All I remember was seeing his hands waving in the air, his full glass of red wine sitting on the edge of the end table  and then catastrophe.  It was one of those moments that seem to happen in slow motion.  His glass went flying and red wine spilled everywhere covering the carpet around where he was sitting.  It took one trip to the store for cleaning supplies, two hours of our time, and a ton of elbow grease to partially hide the stain.  Our carpet was never the same.  Spraying red wine on the Mohawk carpet samples brought back bad memories.  The amazing thing is, the stain washed right out.  With a little water it was as good as new.  
license to spill tour
The Mohawk Flooring representative told me about how it has SmartStrand technology built into the carpet fiber itself.  It has permanent dirt and stain resistance that won't wear off.  Most carpets just have this applied topically and it wears off over time.  I was also surprised that she only used water to clean the carpet.  On tough stains you can add a little mild detergent.  I needed this carpet two years ago in my house!  
mohawk carpeting
Chef Ryan Scott had his sloppy joes ready, and the line was growing, so I went to go wait my turn.  They smelled incredible but I had to hold tight a little longer.  The BetterTV crew was there to film the event.  Even Samantha Harris, from Dancing With the Stars, was there interviewing Ryan Scott about his food.  She then did a spot with Chip Wade.  Samantha took a sloppy joe, rubbed it into the SmartStrand carpet, and Chip cleaned it.  Once again, the food came right out.  Then it was finally time to taste what I had been waiting so long for.  The sloppy joes were being served and they didn't disappoint.  The tasty morsel consisted of tender chicken enveloped by a crunchy biscuit, topped with a couple Fritos, and smothered in a creamy cheese sauce.  I had to go back for seconds.  The recipe was fantastic and Chef Ryan Scott was very personable, even while trying to get everyone through the line.
license to spill ryan scott
All-in-all it was a great day.  I was able to taste a great recipe and find out about Mohawk, who makes a great stain resistant carpet.  Mohawk is even giving away a free 6'x9' SmartStrand Silk bound carpet rug.  Just go to their site HERE for a chance to win!  On my way to explore the rest of the festival, I grabbed a few more carpet squares to test them out at home.  After home testing, I was able to clean up coffee and red wine very easily.  

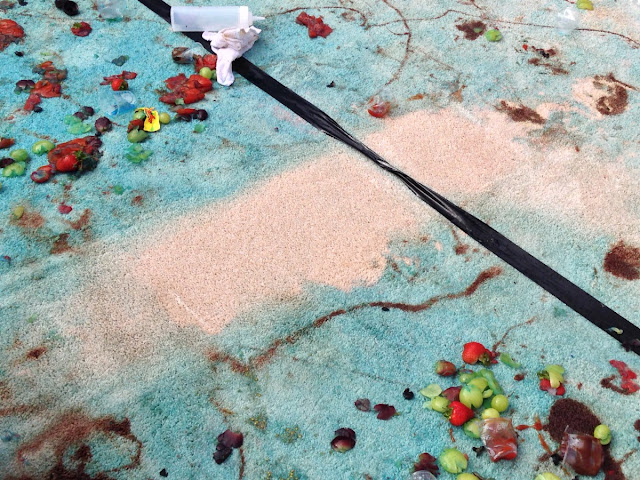
Oh wait, you never did see how that carpet cleaned up did you?  You know, the one that my kids threw food on and then trampled in the stain.  The picture is below and I personally watched the cleaning process.  They had to use a small carpet cleaner (the kind you rent at the grocery store) because the stains had been sitting in the sun for hours.  You can see the clean stripe down the middle.  I never thought it would come out but in a matter of minutes it did!  

If you are in the Phoenix area you need to check out the License To Spill tour because they are headed to you next.  Click HERE to find out all the details or check Mohawk out on Facebook HERE.  

clean carpet


#parentproductreviews

The Nightmare Before Christmas Jack and Oogie Boogie

Monday, October 21, 2013

Jack skellington kids Halloween lunch
Year 2, Week 10: The Nightmare Before Christmas Bento Lunch.  One of our favorite family things to do this time of year is to watch the movie "The Nightmare Before Christmas."  We just saw it tonight and my kids are all excited over it once again.  We all agree that the best scene is when Jack Skellington goes to Christmas town for the first time and sings, "What's This?"  I had to make a lunch on this theme or this week just wouldn't be right.  

The Pumpkin King kids lunchI also tried making Forbidden Rice for the first time and included it in this lunch.  It is the black rice you see in on Jack's face and surrounding his head.  This type of rice is really healthy for you and my kids gobbled it up!  The other great thing about this lunch is that the pieces of the lunch don't have to match and can be out of proportion.  That's how it is in the movie so pieces like Jack's eyes can be different sizes and it looks better.  Also, don't be afraid to use little Halloween decorations to dress up this and other lunches.  I used little plastic spiders and bats and it saves a ton of time.  I also made this in a Planetbox Rover lunch box.  If you want to see my Nightmare Before Christmas Lunch from last year, click HERE. Have some fun and remember--This is Halloween!


Oogie Boogie
Ingredients:
--1 serving white and black rice.  I used minute rice and forbidden rice.
--1 sheet of nori (dried seaweed)
--8-10 pieces of turkey
--1 packet of bone shaped candy
--4-5 slices of dried mango
--Black food coloring or food coloring marker
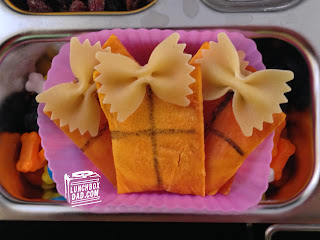
--4-5 pieces of bowtie pasta
--1 handful of raisins
--1 slice of white cheese
--Small plastic Halloween decorations


The Nightmare Before Christmas Presents
Directions:
1.  Place white rice in a circular container.  I used a Planetbox dipper.  Fill it up almost to  the top.  Cut out two round shaped nori pieces for Jack's eyes and a narrow "U" shape mouth.  Put pieces on top of the white rice.
2.  Use black rice for Jack's nostrils and for the stitches on his mouth.  If you use a toothpick to place the rice it goes very fast.  The black rice will stick well to the nori and white rice.
3.  Surround Jack with black rice if desired.
4.  In a side dish arrange turkey or chicken pieces.  I thought they looked like spooky clouds, plus they added protein.
5.  Slice 4-5 pieces of mango into squares.  Make sure they don't have straight sides to go along with the movie theme.  Draw ribbon with black food coloring and paste on bowtie pasta with a little dab of cream cheese.  Arrange in a second side dish and surround with bone shaped candy.
6.  For Oogie-Boogie, cut out his head as shown.  Make little slits for the eyes and mouth and then cut out the details of all three using small scissors.  It is much easier than it looks because it should be a little jagged and rough so don't try and make it perfect!  When done, lay it on top of a piece of cheese and cut a circle out around it.  The nori will stick to the cheese very well.  If using a silicone cup, tear up the rest of the piece of cheese and put it underneath the circle of cheese so you don't waste it.
7.  Last, spread around a few plastic Halloween decorations to add a little color.  Just wash them first.

Thanks for following me and have a great week leading up to Halloween.  Remember to check out my Facebook and Twitter pages to see all the updates and more great Halloween ideas from my friends!
Jack Skellington Halloween lunch
#lbdbento

Corn Dracula Halloween Lunch

Thursday, October 17, 2013

Vampire bento lunch
Year 2, Week 8: Corn Dracula Lunch.  Nothing says "Halloween" like Count Dracula.  Well, thats not exactly true, loads of candy says "Halloween" pretty well also.  While I like to keep my daughter's school lunches pretty healthy I also love a good bag of candy.  Every good parent knows that a child's full bag of candy by day turns into a parent's personal treat stash at night!  It's not stealing, it's getting repaid for all the candy we've bought them over the past year, right?

Until the big night comes, there is lots of fun food to be made.  The ideas in this meal will work well for lunches, parties, or just snacks with friends!  I got the idea for the "Corn Dracula" from a dad blogger friend of mine over at Designer Daddy.  He also makes and sells some fun Halloween designs on t-shirts.  Pick one up HERE.  I made this lunch in an Easy Lunch Boxes container and also used a Lunchbox Love Halloween note.
bbf blog hop
This lunch is also part of a Halloween Lunch Blog Hop today.  The hop is full of some great ideas, just click the button above (after you read my recipe of course) to go to see my friend Shannon's lunch over at bentolunch.net.
bento lunch
Ingredients:
--1 corn on the cob with husks
--1 serving of baby carrots
--1 serving of salami or other meat 
that your child likes
--1 serving of cheddar cheese
--A few pieces of nori
--2 small triangles of mushrooms 
or cream cheese
--1 serving of dried apples
--1 wedge of apple (plus a little PB&J if you want to spread it inside the apple wedge)
--2 almond slivers
--1 serving of Ghost shaped chips (I bought these "Boo Chips" at Whole Foods)
halloween lunchbox note
Directions:
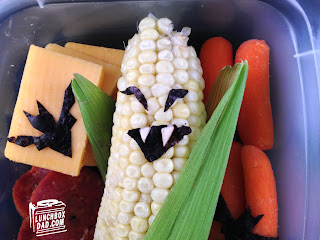
1.  Shuck one ear of corn but save the husks.  Cook corn as desired.  Set corn in container and arrange two leaves around it as shown in picture.
2.  Cut mouth, eyes, and bats our of nori (dried seaweed).  Put eyes and mouth on corn and then put mushroom triangle pieces on for teeth.
3.  Arrange carrots, meat, and cheese around the corn.  Try and use orange and other Fall colors.  Decorate with nori bats.
4.  Stick almond slivers into apple wedge like dracula teeth.  Spread peanut butter in the mouth and use jam for the tongue if desired.  Set dried apples in side container and place apple dracula mouth on top.  Use other dried fruit if you want, but keep to the Fall fruit theme.
5.  In a second side dish place ghost shaped chips.  If you find other shapes you like better feel free to use those instead.
6.  Lastly, I used a Lunchbox Love note.  This was from the holiday series.  It is fun just to throw it in and my daughter really likes the jokes.
holiday bento
I hope you have as much fun looking at the lunches in the blog hop as we did putting them together.  Keep checking back for more Halloween ideas here on Lunchbox Dad and also follow me on Facebook, Twitter, and Pinterest.  Remember to look at my review pages for advice on lunch boxes and all sorts of other parenting products.  Have a fun and safe Halloween!

Kids halloween lunch
#lbdbento

Scaredy Cat and The Mummy Halloween Lunch

Monday, October 14, 2013

Scaredy Cat and The Mummy: I am part of a Halloween lunch blog hop this Thursday so you will be able to see my new Halloween lunch then.  Believe me you won't want to miss this blog hop.  You will be able to get so many ideas for kid's lunches, Halloween parties, and much more.  I will have a new post Thursday morning and will be reminding you about it over all my social media networks, so please check in on Facebook, Twitter, or any other sites I have listed.

Until then, I thought I would repost one of my Halloween lunches from last year.  This was fun and easy.  To see the original post with the recipe click HERE.  See you Thursday!

Product Review: Yumbox Lunchbox

Thursday, October 10, 2013

Yumbox Product Review

The Yumbox inspiration came from healthy and balanced French school lunches.  The desire was to help parents everywhere pack those kind of lunches for their own kids.  The moms behind Yumbox are so passionate about this that they even developed two iPhone apps to encourage kids to try new foods.  Click HERE to see Kids Food Adventure and HERE to see Choose My Food.  But here is the truth about lunchboxes.  Passion and ideas are all well and good, but if they don't translate to a practical usable product in real life, then it doesn't do us as parents any good.  Click here for the recipe that I made in the Yumbox--a healthy lunchable style lunch!

The first thing I noticed about the box was how heavy it is.  It's not too heavy to carry, but the weight surprised me.  It is listed at 1.5 pounds but certainly feels heavier.  From the outside, it looks like many other lunchboxes, but when I opened it the interior set the box apart.  

The inside clear tray looks nice and I love that it is removable and dishwasher safe. However, the compartments each only hold 1/2 cup of food each. This is perfectly fine for younger children, but older kids might need a little more. This all depends on the individual's appetite. The other part of the tray that I appreciated was that each compartment is labeled to remind you of the food groups that help make a balanced diet.

When I first opened the box, I didn't pay much attention to the silicone on the lid. This is a useful feature, though, because it seals each compartment. It is not recommended that you fill it with liquids such as soup or watery dressing. You can pack foods with a "Ranch Dressing" like consistency.  I always recommend testing liquids if you are unsure if they will work.  In our testing, we didn't see any leaks, but it is best to be cautious when packing lunches.  You don't want your child to arrive at school and find yogurt covering all their other food.

When it comes to the outside, my main concern was the durability of the hinge. I thought that with a few drops the hard plastic pieces would break. I did accidentally drop it on the cement and the hinges held up fine. Only time will tell how durable they are but for now they seem to hold up with no problem.  The latch is easy to use and my 7 year old was able to work it with ease.

Overall, the Yumbox met my expectations.  I liked the removable tray, the reminder labels, and the silicone seal on the lid.  However, it was a little heavy and the portion size will probably be too small for older kids and adults.  Yumbox will be coming out with a bigger box soon, so I am looking forward to seeing how they adjust the compartment size and if they introduce any new features.  The customer service was also great.  If you are looking for a smaller basic box with little food compartments that can seal, then check out the Yumbox.  You can find it online at www.yumbox.com for $28 in either pink or green.

Disclosure: Yumbox sent me this product to review.  I have received no other compensation for this post and the opinions I’m expressing here are solely my own.

#lunchboxreview

Scarecrow Lunch

Monday, October 7, 2013

Scarecrow lunch for kids
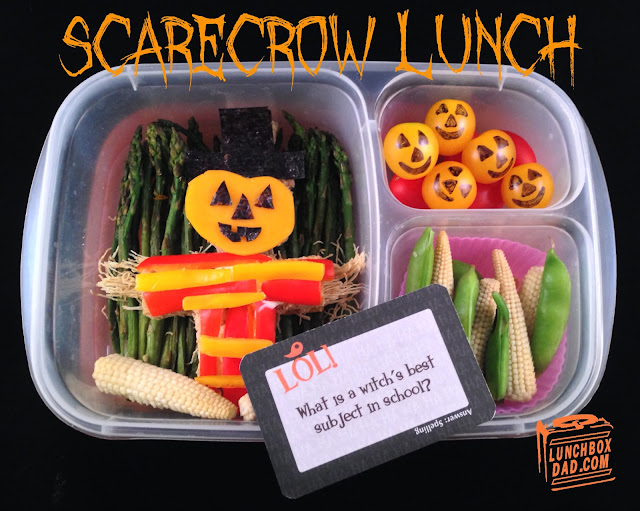
Year 2, Week 7: A Scarecrow Lunch.  Halloween is a fun time of year around my house.  We plan costumes early and usually dress as a family for fun.  Last year we were Captain Hook, Peter Pan, Tinker Bell, and Wendy.  This year we are going to be...well I wont ruin the surprise.  We also go to a huge Pumpkin Patch Party at our church, but my favorite thing is taking my kids trick-or-treating.  Needless to say I plan to have a lot of fun with lunches for my daughter this season.  

If you want to see some of the fun from last year, look at the lunches from last October.  So have some fun making some great Halloween lunches for your kids this year.  I made this lunch in an Easy Lunch Boxes container and also put in a Lunchbox Love note.  These lunches don't have to be complicated, just put a little love in them!

Ingredients:
--1 slice whole wheat bread
--1 slice of lunch meat
--1 slice of cheddar cheese
--2 sweet peppers, sliced
--1 piece of shredded wheat
--1 serving asparagus
--1 handful baby corn and sugar snap peas
--1 handful grape tomatoes
--1 piece of nori
--black food coloring
--Lunchbox Love Halloween Note (shown below)

Directions:
1.  Arrange asparagus spears "corn stalks" in main container.  I sauteed and cooled them before I put them in the lunchbox.
2.  Slice bread, cheese, and meat into the shirt shape.  Put sweet peppers on top of bread in a striped pattern.  You can "glue" them on with a little string cheese.  Place meat and cheese below the bread.  Slide a little bit of shredded wheat into the end of each sleeve.
3.  Cut a circle of cheese for the head and place on top of a circle of bread.  Cut out nori face pieces and place them on cheese.  You can also cut a hat out of bread and put nori on top to make it black.
4.  Place all of the pieces on top of the asparagus.  
5.  In one side container arrange the baby corn and sugar snap peas.  These are great by themselves or dipped in a little ranch or humus.
6.  In the second side container drop in some grape tomatoes.  I used red and yellow.  For the yellow ones, I drew on them with black food coloring so they would look like jack-o-lanterns.
7.  For the finishing touch, use Halloween themed Lunchbox Love notes.  I show the one I used below.

Thanks for reading my blog and make sure to follow me on Facebook, Twitter, and Pinterest!  Have a great month making lunches for your kids and also check out my expanding section containing reviews on other products for parents.

scarecrow lunch for kids
#lbdbento

Walmart Family Mobile: The Best Wireless For Parents On the Go?

Friday, October 4, 2013

I am a member of the Collective Bias® Social Fabric® Community. This shop
has been compensated as part of a social shopper insights study for Collective
Bias and their client. #cbias #FamilyMobileSaves
#FamilyMobileSaves #cbias
I love finding tools that help make parents' lives easier.  As a family on the go today, I don't know what we would do without a smartphone.  As a dad, I am constantly looking up directions, texting my wife about what I should pick up from the store, and checking my fantasy football scores.  The problem with smartphones is the cost of the plan.  I have had my current provider for awhile but have not been extremely happy with the coverage or the cost.  This lead me on a trip to Walmart to check out their Walmart Family Mobile Plan.  To learn all about my whole trip click HERE.  I was looking for the best wireless combined with the lowest price rate plan.  Our family is on a budget so we are always looking for a cheap wireless plan.  I am also a football fanatic with three fantasy football teams.  It is imperative that the coverage and speed of my cell phone network be up to par so I could make those last minute lineup changes.

When I arrived at Walmart and saw the advertisement for the Family Mobile Plan, I was skeptical.  I had not had a good experience with prepaid cell phone plans in the past.  However, when I read the fine print I knew this was a no risk plan that was worth trying out.  For me, the pros of the Walmart Family Mobile Plan are:
  • No contract, 
  • Unlimited talk, text, and web 
  • Only $39.88 per month.  
Did I mention there is no contract?  This is a HUGE bonus for me!  There is also no credit check and it runs on the T-Mobile network.  T-Mobile gets perfect coverage at my house (my current provider barely gets one bar).  The cons are:
  • No visual voicemail
  • Only 3G speeds, even with a 4G LTE phone.  
The cons are big deals to me, but it was worth seeing if I could live without those to save money for my family.  I quickly did the math in my head and found out the potential savings I could have over a two year period of time.  I say potential savings because I am always looking for hidden charges or fees.  Obviously your savings could be greater depending on how much you pay for your phone service.

#familymobilesaves #cbias

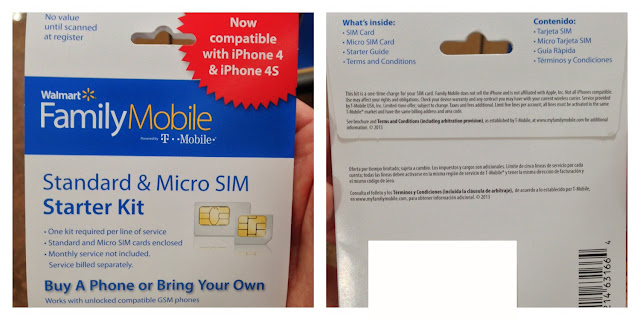
When I realized, that I could save almost $700, I decided I needed to take the chance on this plan.  Then came the surprising part.  There were no hidden fees at the cash register.  I paid $25 for the Walmart Family Plan starter kit.  This was needed because I had to have their sim card put into the phone that I chose.  There was no other activation fee, however.


Before I could go home and try out this new plan, I had to pick out a phone.  Walmart had many smartphone choices.  You can also use your own unlocked GSM phone, but I had the chance to try out the Samsung Galaxy S4.  I had seen the commercials and done my homework.  Many phones can email and lookup movie times, but I had a specific job in mind.  I needed a phone that could do those other things while providing easy to use apps for fantasy football.  I have played for years and know what a difference it can make having a great phone.  When it comes to my three teams this year, I am currently undefeated in one league, middle of the pack in another, and bringing up the rear in my last league.  So I not only must figure out how to stay in first place, but also improve my other teams.  My phone needs to have the capability to give me the insider fantasy information while I'm standing in line at the post office or waiting for my order at the coffee shop.  As a dad on the go, I don't always have the luxury of doing my fantasy football homework in front of the computer.  My phone is my fantasy football best friend.  It was time to put the GS4 to the test.

#FamilyMobileSaves #cbias

The last part of my in store experience might have been the most surprising.  When I buy a cell phone I am used to spending 1-2 hours jumping through hoops before I can walk out the door with it.  I was pleasantly surprised that this wasn't the case here.  When I asked questions that the Walmart clerk didn't know the answer to, he handed me over to his co-worker who addressed my concerns.  I had the choice of activating the phone online, over the phone, or in store.  I chose "in store" in case there were any problems.  The clerk had the sim card installed and my new account activated in around 20 minutes.  A little tip, make sure to write down your Walmart Family Mobile Plan PIN number.  You will need it to make changes to your account later on.  I didn't do this and had to figure out how to get my PIN after I arrived home.

Because I needed to find my PIN, it did give me an opportunity to explore the Walmart Family Mobile Plan site.  I found it simple to use but was a little frustrating because it didn't tell me everything I wanted to know.  When I called in to find out my PIN, I also double checked a few details of the plan.  I wanted to make sure I wasn't getting charged extra (I wasn't).  I was put on hold for an extended period of time and the phone menu was a bit difficult to navigate.  This customer support was the only downside I experienced that day.  Click here to see the Family Mobile Plan site for yourself.

#cbias #FamilyMobileSaves
I will be testing out this new phone and plan over the next couple weeks.  I want to be able to let you know how it works and how it has helped me in my quest for the fantasy football championship.  I do have to say that the phone has already made it possible to make a key quarterback pickup for this week while I was away from my desk.  I will make sure and put the Walmart Family Mobile Plan to work and share with you whether this really is as good a deal as it seems on the surface.
#FamilyMobileSaves #cbias

#parentproductreviews

Bonus Lunch: A Little Love in Your Lunchable

Wednesday, October 2, 2013

Homemade lunchable style bento kids lunch
Bonus Lunch: A Little Love in Your Lunchable.  Sometimes a simple lunch is best.  Lunchables are a booming business and you can't go into an elementary school lunchroom without seeing those grab and go lunches.  The problem is they can be expensive and unhealthy for your kids.  A great alternative is making your own "Lunchable" type meal for your child.  It is easier than you think and kids love taking part in assembling their own lunches.  Even if you pick out the food, they can put it together however they want to!  

My daughter loved this lunch because she could make it her own.  I put it together in this Yumbox lunchbox because it works well for smaller lunches like this one.  So next time you need an easy, healthy, customizable lunch make your own homemade lunchable!


Ingredients:
--Pretzel sticks
--3 cheese slices
--1-2 pieces of whole wheat bread
--1 kiwi (or another fruit)
--2 sweet peppers
--1 serving of roast beef (or whatever protein your child likes!)
--1 serving yogurt covered raisins

Directions:
1.  Using a container with multiple compartments, place your vegetables in one compartment and cut up fruit in another.
2.  Slice your bread into squares and stack it in your container.  Arrange your protein (meat, hard boiled eggs, etc.) next to the bread.
3.  Find a place for your pretzel sticks and yogurt covered raisins.
4.  Using a cookie or vegetable cutter, make the cheese into fun shapes.  Spread it around the other food to decorate.  You can secure food down using decorative picks or just pack it tightly enough that it wont shift.

Remember to listen to what food your child enjoys but also try and have a healthy balance.  Watch for my review of the Yumbox next week.  Remember to follow me on Facebook, Twitter, and Pinterest so you don't miss any news and see tons of bonus items that I post!
#lbdbento
 
site design by Design Chicky (© copyright 2015)