Pages

Week 8: Scaredy Cat and The Mummy

Monday, October 29, 2012

halloween kids lunch

Week 8: Scaredy Cat and The Mummy.  This week I sort of ran out of time and energy, I have been working a lot, but I came up with this to finish up our Halloween themed lunch series.  Its pretty simple but hopefully she will like it.

I used the standard Romaine lettuce for the background.  It works well for Halloween because of the darker parts.  For the ground I threw in some Craisins because they are pretty healthy and my daughter loves them.  I used the apple moon again because we are almost out of apples and it works well for Halloween.

I cut the "Scaredy Cat" out of bread and used Nutella to darken it up.  For the red eyes I cut up bits of strawberry.

For the Mummy, I used a hot dog and pizza dough.  I got this idea from Family Fun magazine and have used it before.  You can use breadstick or pizza dough from the cylinder shaped can at the supermarket, roll it out, and cut it into 1 inch strips.  You then wrap it around the hot dog to look like a mummy.  Bake it in the oven at 375 for about 14 minutes.  For the eyes, I like to use mustard because it looks good and goes well with the hot dog.

Let me know what you think and be sure to follow Lunchbox Dad on Twitter and Pinterest!
#lbdbento

Halloween Themed Dinner!

Saturday, October 27, 2012

My wife and I put together a Halloween themed dinner last night so I thought I would give the readers of my Blog a bonus post for this week.  This was just a fun dinner for our family.  Many of the ideas were taken from Family Fun Magazine and were pretty easy to do.  So maybe this will inspire you with some ideas.

Ghost Potatoes.  These were slices of baked potatoes with sour cream on them and green onion faces.


Melon Brains.  This was a cantaloupe that we carved like brains.  We used a vegetable peeler on the outside and a paring knife to do the carving.


Apple Vampire Teeth.   These are apples that we cut out like lips and then inserted sliced almonds into them.  Make sure and coat with lemon juice right away to keep them from turning brown!


Spider Cupcakes.  These are cupcakes with rosting we turned gray with black food coloring.  The outside is chocolate sprinkles and licorice for the legs.  The eyes are mini oreos with chocolate chips in the middle.


Rotten Apple Punch.  This is apple cider died black with gummy worms, really simple.


Cheesy Frankenstein Fingers.  This is string cheese carved to look like fingers with brussel sprout fingernails.
#lbdbento

Bonus Post Tonight!

Friday, October 26, 2012

Hey lunchboxdad readers, check back tonight for a bonus post of our family Halloween themed dinner.  I will try and post up pics early tonight or tomorrow morning.  My wife and I have been working hard so stay tuned!

Week 7: A Nightmare Before Christmas

Monday, October 22, 2012

Halloween nightmare before christmas kids lunch
Week 7: A Nightmare Monday!  I decided to do a Nightmare Before Christmas because it is one of mine and my daughter's favorite Halloween movies and we just watched it again.  This week was pretty simple.

As always, post your comments for me and let me know the best way that you have found to hard boil eggs and peel them.  Any tips and tricks to it?  Remember to follow me on Facebook, Twitter and Pinterest.  Check out my vdeo tutorials on YouTube as well.  Have a "Nightmare" of a week!


Ingredients:

1 frozen slice of whole wheat bread 
   Yellow, blue, and red food coloring and/or food coloring markers
6 red grapes
2 hard-boiled eggs, peeled
1/2 Tbsp. fat-free strawberry cream cheese
1 serving grape jelly
1 round slice of white cheese 
2-3 leaves of romaine lettuce

1 small piece of nori (dried seaweed)

Directions
  1. Cut swirly hill out of a slice of frozen bread.  Cover swirly hill with grape jelly.
  2. Cut small slice off the back of each hard boiled egg so they will lay flat.  Trim both slices into ears for Zero the dog as shown in picture.
  3. Mix equal parts yellow, blue, and red food coloring in a small bowl to make the color black.  Dip the end of a toothpick in the black coloring and use it to draw the details on the two hard-boiled egg faces (Jack and Zero).  Place small dab of strawberry cream cheese on Zero’s face for his nose.
  4. Using small scissors, cut the nori into the shape of a small girl (Sally), similar to the one in the picture.  It doesn’t have to be exact, just do your best!
  5. Place lettuce leaves in the container as background.  Set circular slice of cheese in the middle as the moon.  Put in the swirly hill in the bottom right corner. Place the two eggs as shown.  Set the girl above the hill, as if she’s standing on it.  
  6. Lay the grapes along the bottom in a line.  If desired, cut a few of the grapes into cross shapes like tombstones.
#lbdbento

Week 6: Jack O' Lanterns

Monday, October 15, 2012

kids halloween lunch
Week 6: Jack O' Lanterns.  This weekend I was gone for work from Thursday through Sunday at midnight, so this Monday's lunch isn't as elaborate as usual.  I had to plan ahead of time and include stuff that would keep so I could just put it together Monday morning.

We have three apple trees in our backyard, so we have been drying apples.  I used these dried apples for the ground since they sort of look like dried leaves and my daughter loves them.  The background is romaine lettuce.

For the Jack O' Lantern I sort of cheated because of time.  I used a cookie cutter to cut out the shape of a pumpkin from bread, meat, and cheese.  I then put it all together to form a sandwich with the cheese on top.  I then cut the eyes, nose, and mouth out of black olives.

For the side torches I used pretzel sticks.  The fire part is made out of fruit roll up.  I cut a piece off the whole roll up then cut strips down most of one side to create the fringe.  After that I rolled it onto the pretzel stick.  It makes a good sweet and salty snack.

As always, let me know what you think and thanks for checking out my blog.  Remember to leave comments here or follow Lunchbox Dad on Twitter or Pinterest.
#lbdbento

Week 5: Spooky Graveyard

Monday, October 8, 2012

halloween spooky graveyard lunch
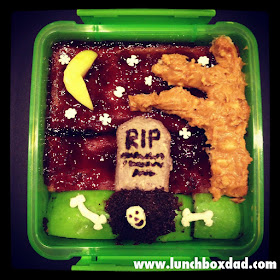
Week 5: Spooky Graveyard.  It's a spooky lunch Monday!  I decided to do Halloween themes this month, so this is my first attempt at not doing an actual character, but doing a scene instead.  It was fun to do and didn't take me as long as I thought it might.  Last weeks the Dora and Boots lunch fell apart on the way to school and I had to do emergency first aid when I got there.  It was probably because it was too big of a container so I went smaller with this week's spooky graveyard.  Here is the breakdown of how I did it.

It is basically a PB and J sandwich.  I used whole wheat bread for the background and covered it with grape jelly for a night sky feel.  The stars are just a couple white sprinkles.  This is going to be messy so my wife threw in some wet wipes for my daughter to clean up with.  The tree is bread with chunky peanut butter.

I used a yellow apple for the moon and green apples for the grass.  I have three apple trees in my backyard so they were easy to get.  For the fresh dirt by the grave I used a little nutella with a little bit of chocolate sprinkles on top of the apple.  The bones are cream cheese and I just formed them into that shape which was surprisingly easy to do.

The tombstone is a piece of bread with cream cheese on it.  A cool thing I found was that if you use equal parts red, blue, and yellow food coloring it will make black.  I used this to write on the tombstone and to make the skull face.  I also mixed a little black food coloring with cream cheese to make it gray.  It is hard to tell from the picture but the tombstone actually is gray.

Let me know what you think or what you might have added to enhance it.  Please remember to share on Facebook, Twitter, or Pinterest if you like it!
#lbdbento

Week 4: Dora and Boots

Monday, October 1, 2012

dora the explorer kids lunch
Week 4: Dora and Boots.  Mondays are for exploring!  My daughter is in a spanish immersion class at her school, plus she loves Dora the Explorer.  So I thought I should do Dora and Boots this week.  Don't ask me how long it took, it was definitely the most labor intensive lunch so far.  This was mostly because I needed to find a container to make it look nice and to fit Dora's big hair.  That hair was hard to cut out.  Her hair is made out of Nori.  It just works really well when you need black areas in different shapes.  I use scissors instead of a knife to cut it.  Anyway, here is what goes into this lunch.

Let me know what you think, or if you have any ideas that I could have used to make it better!  I appreciate any comments you might have.  Remember to follow me on Facebook, Twitter, Pinterest, and YouTube!

Ingredients

2 slices whole wheat bread
1 serving peanut butter and jelly
1 Tbsp. low-fat strawberry cream cheese
1 Tbsp. fat-free cream cheese
2 mandarin oranges
1 grape tomato
1 sheet nori (dried seaweed)
1 cup of fresh spinach
1 piece of red licorice
   Blue and black food coloring

3 blue corn tortilla chips

Directions
  1. Cut both pieces of bread in a circle shape for Dora’s head.  Spread peanut butter and jelly on the pieces.  Press pieces together to make a sandwich.  Use template to cut Dora’s hair out of nori.
  2. Place two oval spots of cream cheese on the bread for the eyes.  Mix equal parts red, yellow, and blue food coloring to make black.  Use a toothpick to apply the black food coloring to create the details on Dora’s face as shown in the picture.
  3. Break blue corn tortilla chips into the head, body, arms, and tail for Boots.  Spread strawberry cream cheese on head piece for his face and ears.  Put two dots of white cream cheese on his face for eyes.  Use toothpick to put one dot of blue food coloring on each eye and black food coloring for his nose and mouth as shown in picture.  
  4. Spread spinach as background in your container.  Place Dora’s head piece on the left of the container.  Place hair on top of her head.  
  5. Arrange Boots’ body pieces to the right of your container, as shown in picture.  Slice grape tomato in half and put on stomach.  Use two small pieces of licorice for each boot and place under his body.
  6. Finish by peeling oranges and dividing them into sections.  Make a border around the container with orange sections.
#lbdbento
 
site design by Design Chicky (© copyright 2015)